Setting Up a Mac From Zero
[TOC]
External Drive System
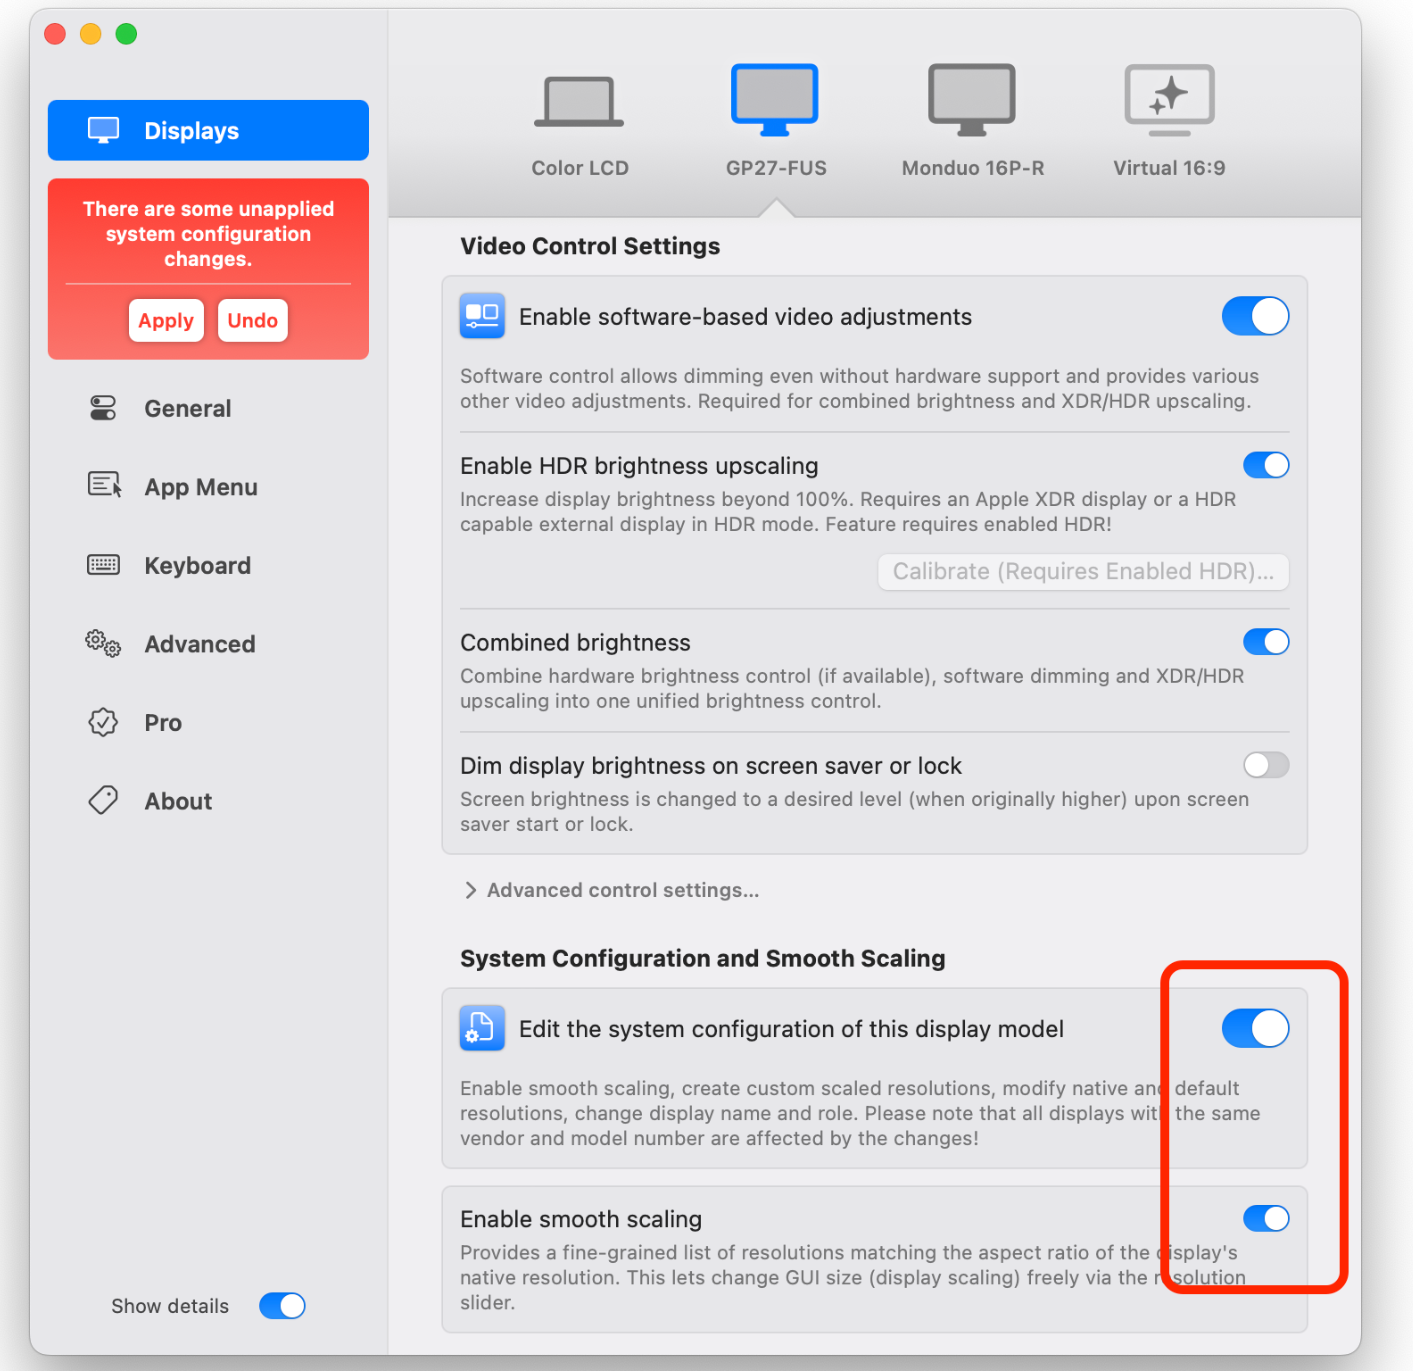
Adjusting HiDPI
BetterDisplay software, available on GitHub.
Enable flexible scaling:
-
Launch the app and open the app menu (find the BetterDisplay icon in the menu bar).
-
Open
Settings(gear icon at the bottom of the menu). -
Navigate to the
Displayssection and select the desired display. -
Enable
Edit the default system configuration of this display modelunder the display you want to scale. -
Enable
Enable flexible scalingin the option that appears below it. -
If you have done this for all relevant displays, click the
Applybutton in the red area that appears. -
Enter your administrator credentials and restart.
-
After restarting, use the resolution slider in the app menu to scale the desktop.
Proxy Configuration
Edit ~/.zshrc in the terminal:
export https_proxy=http://127.0.0.1:7890
export http_proxy=http://127.0.0.1:7890
export all_proxy=socks5://127.0.0.1:7890
This adds command-line proxy settings.
Installing Homebrew
/bin/bash -c "$(curl -fsSL https://raw.githubusercontent.com/Homebrew/install/HEAD/install.sh)"
After installation, follow the prompts to add environment variables.
Install basic command-line tools:
brew install git
brew install vim
brew install wget
brew install curl

brew install btop
brew install tmux
Software
App Store
Xcode, WeChat, QQ, Baidu Netdisk, Feishu, Tencent Meeting, Sunflower, Evernote, NetEase Cloud Music, LogiOptions, NetEase Mail Master
Configuring the Terminal
Recommended: follow the documentation to install Oh My Zsh.
MuZhi's video (recommended) - installs directly into .zsh folder without Oh My Zsh
You can also add Google search as a fun extra.
Configuring SSH and Keys
Setting Up the SSH Server:
-
Enable SSH:
- Open "System Preferences".
- Click "Sharing".
- Check "Remote Login" in the service list.
- Choose which users can access: all users or specific users.
-
Configure the firewall (if enabled):
- Make sure the firewall allows inbound connections on the SSH port (default: 22).
-
(Optional) Configure SSH options:
- Open Terminal.
- Edit the SSH config file, usually at
/etc/ssh/sshd_config. - You can change settings like port number, login attempt limits, etc.
- After modifying the config, restart the SSH service:
sudo launchctl stop com.openssh.sshd
sudo launchctl start com.openssh.sshd
Setting Up the SSH Client:
-
Generate an SSH key (if you don't have one yet):
- Open Terminal.
- Run
ssh-keygenand follow the prompts. This generates a public/private key pair. - The public key is saved at
~/.ssh/id_rsa.pubby default; the private key at~/.ssh/id_rsa.
-
Add the public key to a remote server:
- Use
ssh-copy-idto add your public key to the remote server's~/.ssh/authorized_keysfile, enabling passwordless login. - If the remote server doesn't have
ssh-copy-id, manually copy the public key content into the remote server'sauthorized_keysfile.
- Use
-
Connect to the remote server:
- Use
ssh [username]@[remote_host]to connect, where[username]is your username on the remote server and[remote_host]is the IP address or hostname.
- Use
Setting Up C/C++ Environment
To set up a C/C++ development environment with OpenMP and MPI support on a fresh Mac:
-
Install Xcode:
- Xcode is Apple's official IDE, bundled with the Clang compiler and essential development tools. Download and install the latest version from the Mac App Store.
-
Install Homebrew:
- Homebrew is a convenient package manager for installing open-source software on Mac. Run this in Terminal:
/bin/bash -c "$(curl -fsSL https://raw.githubusercontent.com/Homebrew/install/HEAD/install.sh)"
- Homebrew is a convenient package manager for installing open-source software on Mac. Run this in Terminal:
-
Install GCC (for OpenMP support):
- Mac ships with Clang, but Clang's OpenMP support is limited. Install GCC via Homebrew for better OpenMP support:
brew install gcc
- Mac ships with Clang, but Clang's OpenMP support is limited. Install GCC via Homebrew for better OpenMP support:
-
Install MPI:
- Choose an MPI implementation like Open MPI or MPICH, then install via Homebrew:
brew install mpich
- Choose an MPI implementation like Open MPI or MPICH, then install via Homebrew:
-
Configure environment variables:
- Add GCC to your PATH so you can use
g++directly for OpenMP code. Edit or create~/.bash_profileand add:Then runexport PATH="/usr/local/opt/gcc/bin:$PATH"source ~/.bash_profileto apply changes.
- Add GCC to your PATH so you can use
-
Test the setup:
- Write and compile a simple C++ program using OpenMP and MPI to verify everything works.
-
CMake (optional but recommended):
- CMake is a cross-platform build system that makes building projects easier across environments. Install via Homebrew:
brew install cmake
- CMake is a cross-platform build system that makes building projects easier across environments. Install via Homebrew:
-
Development notes:
- When compiling OpenMP code with GCC, add the
-fopenmpflag. - When compiling MPI code, link the appropriate libraries, e.g.
-lmpiand-lopen-rtefor Open MPI.
- When compiling OpenMP code with GCC, add the
Note: the above guidance is based on information up to 2021. Adjust as needed based on current Homebrew and package versions.
Python
To set up a Python development environment on a fresh Mac:
-
Install Homebrew: Homebrew is a package manager for macOS. Open Terminal and run:
/bin/bash -c "$(curl -fsSL https://raw.githubusercontent.com/Homebrew/install/HEAD/install.sh)" -
Install Python: Install the latest stable Python 3 via Homebrew:
brew install python -
Verify the installation: After installation, run
python3 --versionorpython --versionto check the installed version. -
Install pip: Python 3 usually comes with pip bundled. Check with:
pip3 --versionIf it's missing or needs updating, install or upgrade via Homebrew:
brew install pip
Installing Anaconda
Installing LaTeX
Installing Docker Desktop for Mac
Configuring VS Code
Yes, Visual Studio Code (VS Code) supports syncing your settings, extensions, and other personalizations via Settings Sync. To sync VS Code settings on a new Mac:
-
Open VS Code.
-
Use
Cmd + Shift + Pto open the Command Palette. -
Type
Settings Sync: Turn Onand select it to enable Settings Sync. -
You will be prompted to sign in with a Microsoft or GitHub account. Choose one and sign in. This is the account where your settings are stored and synced.
-
After signing in, VS Code will ask what you want to sync. You can choose to sync extensions, settings, keyboard shortcuts, snippets, UI state, and more.
-
Once you complete these steps on your new Mac, VS Code will begin syncing your previously saved settings.
Make sure Settings Sync is also enabled on your other devices and signed in with the same account, so your settings sync across devices. If you have workspace-specific settings, additional steps may be needed to ensure those sync as well.
Time Machine
Configure Time Machine.